Notice : despite the application quality, using it without licenses is barely viable. Why that, you ask? Because despite the two roles provided by the opensource (free) version – admin and regular user – none of those can prevent any user to update and even archive public channels. If you plan to grow a friends and family community, good luck preventing to put everything upside-down! For this reason, I highly recommend you to use Rocket.Chat instead, for which I will write a similar article.
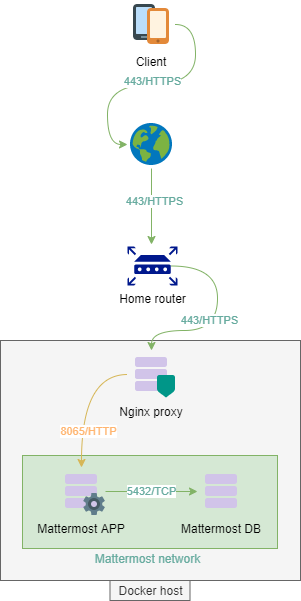
This post will try to best describe the way to deploy a Mattermost app using Docker, PostgreSQL and Centos Stream 8. This documentation is meant to be really easy to understand and apply, only two containers are going to be deployed: DB and APP.
Network consideration
First, we are going to create a dedicated network to put our two containers, this way we are isolating the whole Mattermost architecture from the rest of the world. A more production-ready approach would require segregating the DB from the APP, and add a reverse proxy at the front.
# Create our mattermost dedicated network using Bridge mode
docker network create --driver bridge mattermost-net

# To see your networks
[supertanker@docker ~]$ docker network ls
 NETWORK ID     NAME                 DRIVER    SCOPE
 e2f6f37df707   bridge               bridge    local
 b1f6b243e90a   host                 host      local
 ddaac33f0860   network-mattermost   bridge    local
 2b0615c84b42   none                 null      local
PostgreSQL container
# Get the image from the repository
docker pull postgres
# Create a new volume on the host, in order to persist data.
docker volume create mattermost-vol-db
# Spin up the container, including the network and volume we have created above:
docker run --detach --restart unless-stopped -v mattermost-vol-db:/var/lib/postgresql/data --network mattermost-net --name mmt-db-01 -e POSTGRES_PASSWORD=y5g9Z24%SDcwi7u^2gcH*T%5aJz7Z postgres
–detach will put the container in the background while –restart unless-stopped will start the container at host startup or if it crashes.
Your container should be now up and running in the background, here some basic though useful commands:
# Check if your container is running
docker container ls

# Check if data were actually created (sudo is required):
sudo ls /var/lib/docker/volumes/mattermost-vol-db/_data/

# Check the allocated IP address:
docker network inspect mattermost-net
Now we need to connect to our container in order to create our mattermost database
# Connect to the container
docker exec -it mmt-db-01 bash

# Then to PostgreSQL
psql -U postgres

# According to Mattermost documentation, create the DB
CREATE DATABASE mattermost WITH ENCODING 'UTF8' LC_COLLATE='en_US.UTF-8' LC_CTYPE='en_US.UTF-8' TEMPLATE=template0;

# Create a DB user
CREATE USER mmuser WITH PASSWORD 'ApassWordWithoutspecialChars';

# Grant the user access to the Mattermost database
GRANT ALL PRIVILEGES ON DATABASE mattermost to mmuser;

# Exit
\q

# Quit the container using CTRL+P then CTRL+Q
Additionally but it should be mandatory when running in production, we need to think about backink up the database. To do so, the following command will create a full dump on the host temp directory
docker exec -t mmt-db-01 pg_dumpall -c -U postgres | gzip > /tmp/dump_$(date +"%Y-%m-%d_%H_%M_%S").gz
Up to you to use that command with a cron task or whatever suits you, in order to backup your Mattermost DB regularly.
Mattermost application container
Create a directory called mattermost, this folder will be use to create our custom image only.
Create a file called Dockerfile with the following content
FROM alpine:3.12
 # Some ENV variables
 ENV PATH="/mattermost/bin:${PATH}"
 ARG PUID=1000
 ARG PGID=1000
 ARG MM_PACKAGE="https://releases.mattermost.com/5.35.2/mattermost-5.35.2-linux-amd64.tar.gz?src=docker"
 # Install some needed packages
 RUN apk add --no-cache \
   ca-certificates \
   curl \
   libc6-compat \
   libffi-dev \
   linux-headers \
   mailcap \
   netcat-openbsd \
   xmlsec-dev \
   tzdata \
   wv \
   poppler-utils \
   tidyhtml \
   && rm -rf /tmp/*
 # Get Mattermost
 RUN mkdir -p /mattermost/data /mattermost/plugins /mattermost/client/plugins \
   && if [ ! -z "$MM_PACKAGE" ]; then curl $MM_PACKAGE | tar -xvz ; \
   else echo "please set the MM_PACKAGE" ; fi \
   && addgroup -g ${PGID} mattermost \
   && adduser -D -u ${PUID} -G mattermost -h /mattermost -D mattermost \
   && chown -R mattermost:mattermost /mattermost /mattermost/plugins /mattermost/client/plugins
 USER mattermost

 # Healthcheck to make sure container is ready
 HEALTHCHECK --interval=30s --timeout=10s \
   CMD curl -f http://localhost:8065/api/v4/system/ping || exit 1

 # Configure entrypoint and command
 COPY entrypoint.sh /
 ENTRYPOINT ["/entrypoint.sh"]
 WORKDIR /mattermost
 CMD ["mattermost"]
 EXPOSE 8065 8067 8074 8075

# Do not add Volumes, it was making the container unable to see changes on volumes files...
Replace the value ARG PUID= and ARG PGID= by the ID of the supertanker user, to get it, run the following command
id supertanker
Create a file called entrypoint.sh with the following content
#!/bin/sh
 if [ "${1:0:1}" = '-' ]; then
     set -- mattermost "$@"
 fi
 exec "$@"
Update its permissions
chmod 755 entrypoint.sh
Build the custom image
docker image build . --tag mmt-app
Eventually, create our container using our custom image
docker run --detach --restart unless-stopped -v mattermost-vol-app:/mattermost --network mattermost-net -p 8065:8065 -p 8067:8067 -p 8074:8074 -p 8075:8075 --name mmt-app-01 mmt-app
Our container is now running, however, as we didn’t set the PostgreSQL user, password and DB, you should see the following logs:
docker logs mmt-app-01
{"level":"error","ts":1623228282.1595657,"caller":"sqlstore/store.go:294","msg":"Failed to ping DB","error":"dial tcp 127.0.0.1:5432: connect: connection refused","retrying in seconds":10}
Stop the container
docker container stop mmt-app-01
Go to its volume (using a sudo enabled user)
cd /var/lib/docker/volumes/mattermost-vol-app/_data/config/
Edit the file called config.json and fix the following line according to your DB server
"DataSource": "postgres://mmuser:passwordWithouSpecialChars@mmt-db-01/mattermost?sslmode=disable\u0026connect_timeout=10"
Start the container
docker container start mmt-app-01
And eventually, enjoy the view: http://yourserverip:8065/

 but if you have a Google Home: