If you don’t have access, use the following command to enable PSRemoting on the server you want:
Enable-PSRemoting -SkipNetworkProfileCheck
Note that it won’t work if the server or workstation is using a public network, the command check network profiles before applying this change. However, I got a weird behavior where none of my network profiles were using a public profile but PSRemoting was telling me the opposite. To workaround this, use the following command:
This is a very simple post about some commands I wanted to remember, especially the ones required to install and configure Git on a new computer. I will keep this post updated in the future, so feel free to come again from time to time.
How to push your project code to your new Git server on Windows
First, you need to install Git on your Windows machine, I’m using chocolatey for that task:
choco install git
Then we need to add our remote repository with the following commands:
# Move to your project folder
cd D:\mydir

# Initialize Git
git init

# Add a connection to your remote Git server
git remote add my-app git@10.0.0.77:my-app.git
Now, we need to push the content over the remote repo. Before doing that, we need to add our project’s files to the local repo, them commit those changes and push the whole thing eventually:
# Add all our projects files
git add .

# Commit those new files to the local repo, the message is mandatory
git commit -m 'Initial commit'

# Finally, push everything to the remote Git
git push my-app master
How to deploy Git “client” on Linux
Install the package, here for Ubuntu:
apt get install git
Go to the folder you want, then run the following commands:
cd /var/www/mydir

# Initialize Git
git init

# Add a connection to your remote Git server
git remote add my-app git@10.0.0.77:my-app.git

# Pull the data from the master branch of the remote Git server
git pull my-app master
Ever wished to have a package manager on Windows? Using Chocolatey, you will be able to access either a common repository located online or your own private repo hosted on-premise. Using in addition to automated tools like Ansible, Chef, Puppet or even regular GPO, you will be able to manage your servers and workstations packages like a pro!
This document is just a basic showroom, we will explain how to deploy Chocolatey on your local machine, and run some commands. Later, I will probably update or explain how to manage a local repository.
Installing Chocolatey
It’s very simple, all you need is to open a Powershell v2 command prompt, with administration privilege though, then enter the following command:
This will set the bypass the execution policy, to avoid being block by the restricted mode, then execute a script remotely downloaded from Chocolatey’s website. I would recommend you to download the script manually before, for checking both the website certificate and the script content.
Once it’s done and installed, restart the Powershell console and enter the following command to see if everything went well:
choco
You should get something like that:
Chocolatey v0.10.15
Please run 'choco -?' or 'choco <command> -?' for help menu.
Basic commands
Inspect which repositories are set for the current installation:
Look for a specific packet, see the different version:
choco find vlc
Install the packet you just found:
choco install notepadplusplus
Uninstall a packet:
choco uninstall mpc-hc
Upgrade all the packages:
choco upgrade all
That’s all for now, I will update this topic later. However, you should have seen how easy it is to deploy packages now, and how great it is if you want to create scripts to ease a post server/workstation installation for example.
Desktop template
Here I drop the classic packages I usually install on my workstations, so I don’t need to remember everything.
This post is a sticky note about how to configure your workstation in order to use Terraform with Microsoft Azure.
Configure Azure CLI on your station
First of all, you need to install this client to be able to connect to your Azure subscription. To do so, download the software from the Microsoft website. For Windows users, it’s a simple MSI package to install, then run a PowerShell console to run the login command as follow:
az login
This command will open your browser, and ask you to log in to your Azure account.
Once’s validated, you will be able to see your subscriptions within the PowerShell console. Take note of the tenant ID and the ID of the subscription you want to use further if you have many subscriptions as below:
For information, you can use the command below to see your subscriptions:
az account list
That’s all for the Azure client, pretty simple, isn’t it?
Configuring Terraform on your station
This step is easy too, really, just browse Terraform web page to get the version that suits you. Keep in mind that, depending on the cloud provider (Azure in that very case), a version can or cannot be compatible with the provider. At this time, I’m using Terraform v0.12.21
OK, so unpack the archive to the folder of your choice. From here you can use the previous PowerShell console and browse to this folder. This is optional, but if you want to be able to run terraform from everywhere, you will need to deal with your environment variables. I won’t describe the process in this post though.
Open the Terraform folder with your file browser, then create inside a file called main.tf This file will contain the very basic information in order to connect to Azure:
The first declaration is about the provider required to connect and manage Azure cloud services. Terraform strongly recommend using it to pin the version of the Provider being used. So this value will change in the future. Then set the subscription_id and tenant_id variables with the information gathered earlier. The skip_provider_registration is set to true here due to some restricted permissions I have, that might not be the case for you though.
If you have already created a resource group, you can also add the following declaration to your file:
Just keep in mind that Terraform, sadly, won’t import the resources you defined automatically. You will have to do that manually.
Now, run the following command to initialize Terraform, making it downloading the provider defined and creating the first local state file.
terraform.exe init

terraform.exe init

Initializing the backend...

Successfully configured the backend "azurerm"! Terraform will automatically
use this backend unless the backend configuration changes.

Initializing provider plugins...
- Checking for available provider plugins...
- Downloading plugin for provider "azurerm" (hashicorp/azurerm) 1.44.0...

Terraform has been successfully initialized!

You may now begin working with Terraform. Try running "terraform plan" to see
any changes that are required for your infrastructure. All Terraform commands
should now work.

If you ever set or change modules or backend configuration for Terraform,
rerun this command to reinitialize your working directory. If you forget, other
commands will detect it and remind you to do so if necessary.
Storing Terraform State in an Azure storage
You should see in the Terraform folder a file called terraform.tfstate which contains a representation of what you have in Azure.
If you are planning to work with a team, you should use a common file shared across your people. For that, we are going to create a storage account and a container to put this terraform.tfstate file in it. Note that Azure is handling will manage the lock on that file automatically, avoiding multiple access at the same time from your coworkers. To do so, create a storage-accounts.tf file (choose the name that suits you the best):
Here, we have defined a storage account and a container within, I let you check the documentation about the replication type.
Now, let’s create those resources with the simple command below:
terraform.exe apply
This command will check on Azure to see which change (update, creation or deletion) it has to do. In the end, it will show you the plan, asking you for a yes in order to apply. Type yes and see the magic happens.
Now, you have a container to put your tf file in, however, we need to update our main.tf file in order to use it. Edit the file by adding the following content after the provider definition:
Today, I would like to summarize some of the commands I usually use when I want to check the public IP address used by a server when connected through SSH. It’s a very simple post, yet I think that can help people at some point:
Using curl, the easiest way in my opinion:
curl ifconfig.me
Using dig and OpenDNS, way too complicated if you ask me:
Using wget, if curl is not available (that should never happen though), the file will be downloaded (index.html). You might use a command with pipe in order to get the IP address from the downloaded content:
Before moving further, at this time, there is no way to configure your Azure network to push another gateway that the Azure default to your machine, you can create route for the next-hop, but those routes can’t override the default gateway. Long story short, you will have to manually configure the default gateway of your servers to make them use your Fortigate as their next-hop.
First, you will need to know the different subnets that you will use, in this example, I will use four subnets:
10.62.34.240/28, this one will be used for the WAN connection
10.62.34.160/27, this one will be used to connect machines to port1
10.62.34.128/27, this one for port2
10.62.34.192/28, and the last one for port3
Note that, depending on your interfaces need, you will have to choose a different appliance from the Microsoft pay-as-you-go catalogue. In order to create that appliance with 4 interfaces, I had to pick the Standard F4 (4 vcpus, 8 GiB memory) size. The virtual network and two subnets will be created during the creation process, call the first WAN and the second WEB or whatever makes sense for your port2.
So, you have created your subnets, then your appliance (FGT), and it’s now time to configure your network, before powering on the FGT. Unfortunately, it should have been turned on right after its creation, so shut it down for now.
Configuring the existing subnets
Edit the virtual network created by the wizard, at the time I’m writing this, it’s called FortigateProtectedVNet. You should see your two subnets:
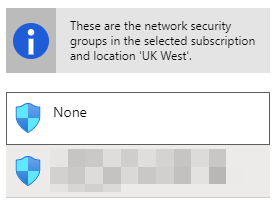
We have to remove the Network Security Group (NSG) assigned by default, except for the WAN subnet, because we want to manage the security through the Fortigate itself. We could have choose to use them as an additional security layer, but in order to keep things simple here, we won’t discuss that part.
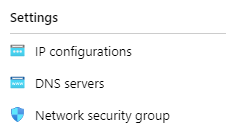
For each existing subnet, click on Network Security Group:
Click on the edit button, then on the NSG assigned:
Choose none in the left list:
On the next screen, clic save to confirm the change, repeat the operation for the second subnet.
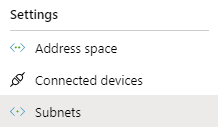
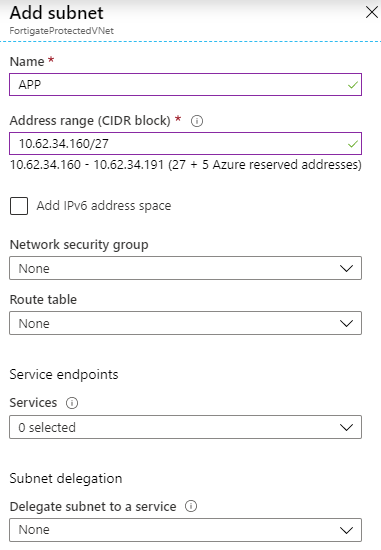
Adding the other two subnets
We need to create the other two subnets. Go back to the FortigateProtectedVNet object, and within the left menu, click Subnets:
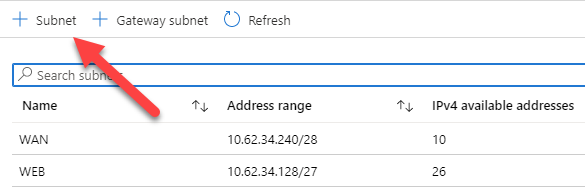
Click the + Subnet button to add a new one:
Add your new subnets, don’t add a NSG or a route table yet:
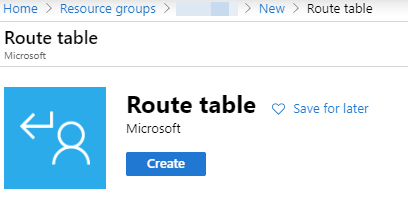
Adding and configuring routing tables
In order to tell your future VMs which routes using to access ressources, Azure is using routing table. These routing tables are linked to one or many subnets.
During the creation of your Fortigate, two subnets were created along two routing tables. We have to configure them (especially the second one) and add two new routing tables for the new subnets we have created above.
Go to your ressource group, then add a new route table object:
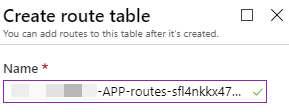
For the naming, I usually use the same name of the automated generated routes, updating only the subnet part, for instance:
Leave the virtual network route propagation enabled.
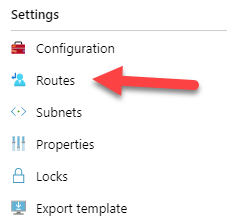
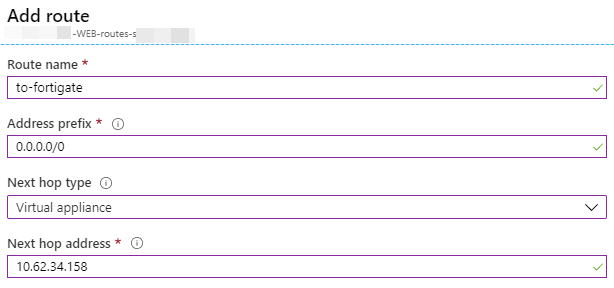
Once your new routes have been created, we need to configure them. The WAN routes doesn’t need to be updated. However, for all the other routes, do the following:
Click on the route table you want to configure, then Routes:
Remove all the current routes defined. Then create this following route to tell your VM to use the Fortigate interface as the next hop:
The next hop must match with the future IP of the Fortigate interface connected to that specific subnet. T
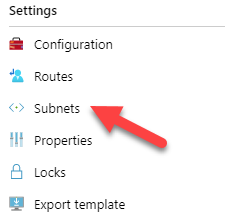
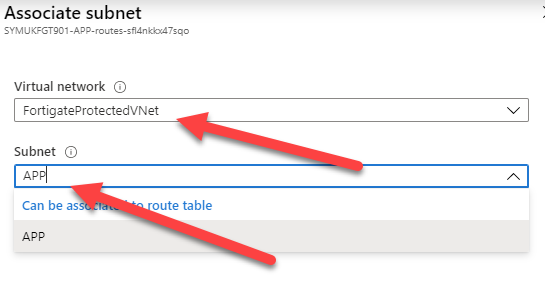
Once the route is added, it’s time to associate the subnet, click on Subnets on the left side:
Click the Associate button, and select the proper network/subnet:
Do the same thing for the other subnets (Except for WAN!)
Add new interfaces to the Fortigate
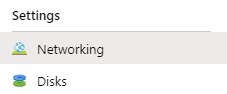
The current FGT has only two interfaces, turn it off then open its object in order to add two new interfaces.
Got to Networking:
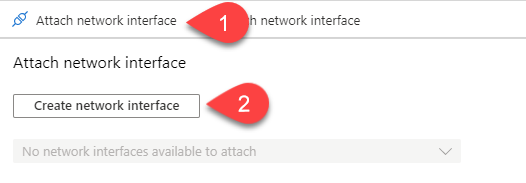
Click Attach network interface:
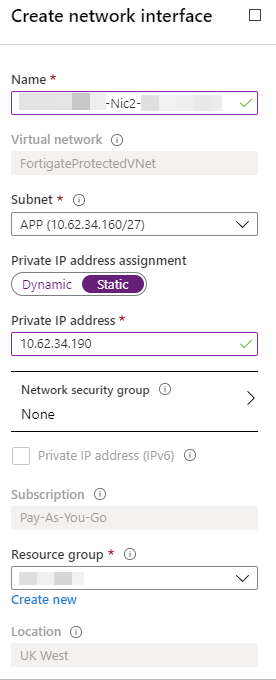
Use the same pattern for the name, replacing the Nic part with the next number (Should be 2 and 3 for APP and DB). Check Static to set your Fortigate interface IP:
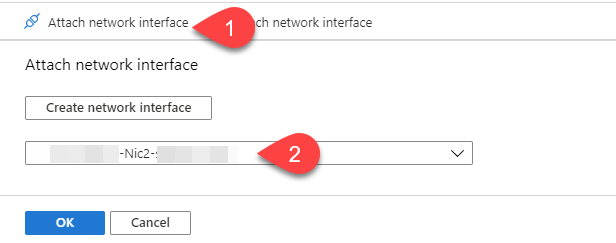
The interface will be created. But you still need to attach it manually on the next screen:
Repeat these operations for the last Nic3 interface.
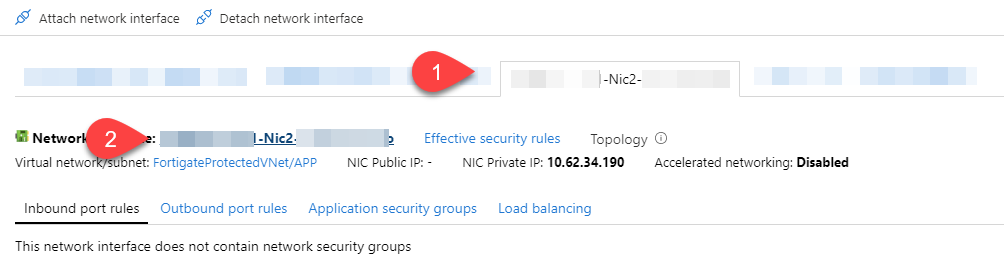
IP forwarding and
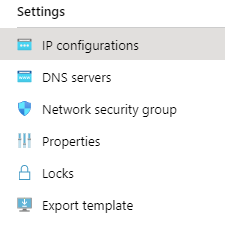
We now need to configure those two new interfaces, for that, click on the interface tab, then on the interface name (#2 on the capture below) to access the configuration pane:
From here, click on IP configurations:
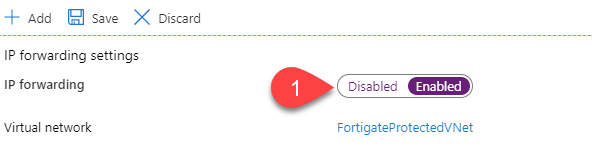
And enable the IP forwarding feature:
Save, and do the same thing with the last interface (Nic3).
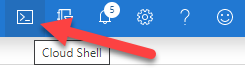
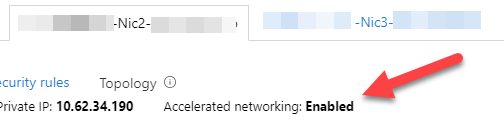
In order to improve performances, we would like to enable accelerated networking, to do so, we need the FGT to be off (That should be the case at this stage) and then we need to run some commands.
Click on the Cloud Shell icon on the top right toolbar:
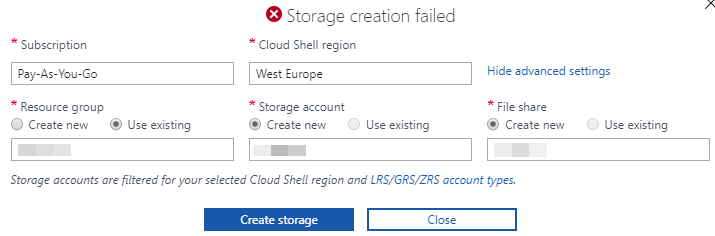
Choose Powershell when asked in the console area, down the window, create a storage (That’s mandatory). If you got a permission issue, click the Advanced Options and from there, create it:
Once connected to the Powershell console, run the following command to enable accelerated networking:
az network nic update --name Nic2 --resource-group YourRessourceGroupName --accelerated-networking true
Exit the console, refresh the whole portal, and you should now see the following:
Accessing your Fortigate
You can now start your FGT, and the use the public IP address created by the wizard to access the portal, using HTTPS.
If you have any issue accessing the interface of your Fortigate, ensure that the NSG created by default still associated to the Nic0 interface, you should have this:
Sending emails is always something tricky to deal with, every ISP, antivirus, security are working on their own solution to fight scams, spam, fishing, etc. That makes difficult to have a proper SMTP server configured and trusted by all those third parties.
This post is not about what you should configure in order to your server to be trusted, but a website you can use to see what you have missed or well configured about it.
That’s being said, please check the following before give it a try:
Ensure the public IP address used by your server to send emails is defined in the SPF record of the DNS server in charge of your domain;
Ensure that a reverse DNS is also configured, binding this public IP address to the same name used by your SMTPS server (Hostname)
Ensure you have configured DKIM
Ensure your public IP address is not blacklisted
Then, you can go to this website, https://www.mail-tester.com/ . From here, you will get a temporary email address to send an email to, then by clicking on th button, it will display a very detailed amount of information about your SMTP server configuration
That’s very handy to check the basic of sending emails on Internet!
Windows Admin Center (WAC) is a new way introduced by Microsoft to manage your servers, workstations, and clusters.
Using TLS between WAC gateway and servers
WAC gateway is the tool you install on a server or workstation to act as a gateway between administrators and servers/stations/clusters. During its installation, you will be asked to choose between regular or encrypted communication between your assets and this gateway. As we should all do, I did choose encrypted communication.
Choosing TLS implies you to deploy a valid certificate for your server to encrypt its gateway’s connection. This certificate must be trusted by your gateway machine obviously. Here the process to do it, using a self-signed one though.
First, if its a workstation and not a server, you need to enable PSRemoting
Enable-PSRemoting
Then allow port 5986 between your server and the gateway (This must be done on the server, because installing WAC on your gateway should have fixed that already.
If your organization has a PKI infrastructure, you will need to configure it to delivers certificates to your servers and workstations.
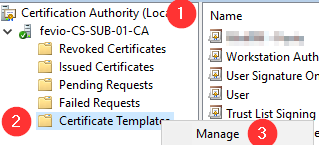
Configure your subordinate CA to delivers WinRM certificates
Open Certification Authority on your Subordinate CA and go To Certificate Templates Management
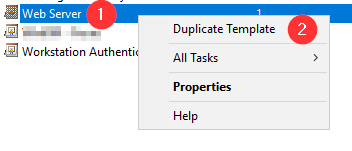
Duplicate the Web Server template
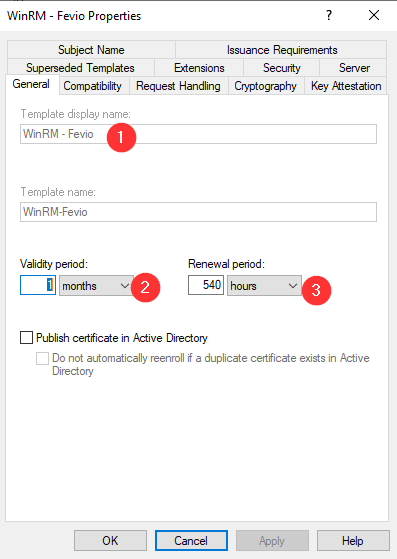
Set a name (Here it’s an existing template and that’s why it’s grayed out) and a validity period (This setting is up to you)
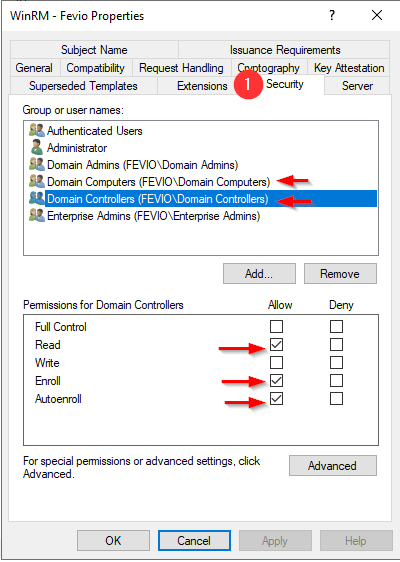
On the security tab, add the groups of devices you want to allow to enroll. In my example, I have added Domains Controller and Computers, so I can both manage my DC servers and my workstations through WAC.
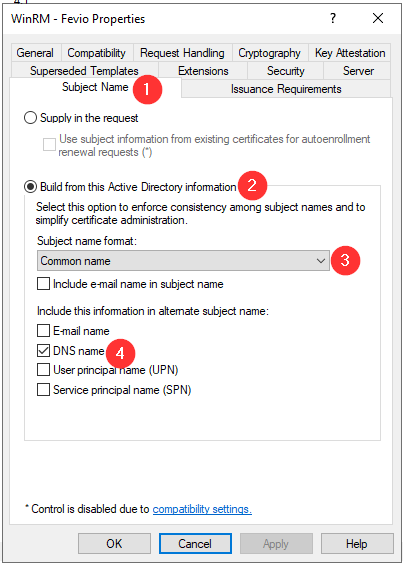
Setup the subject name as above
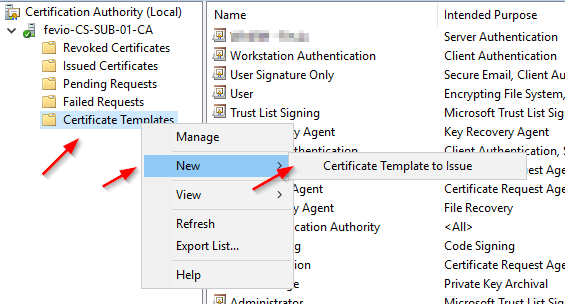
Close the Template manager and add the new template to your Certificate templates to make it available on this CA
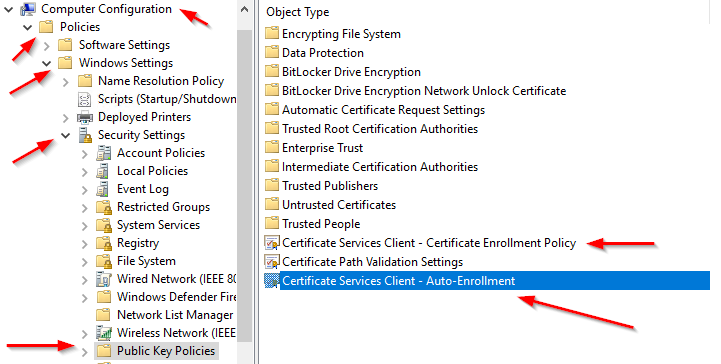
Go to one of your Directory Controller and confirm that a GPO exists with the following Security policies enabled and properly configured
Refresh the GPO on one of the server you want to remotely manage:
gpupdate /force
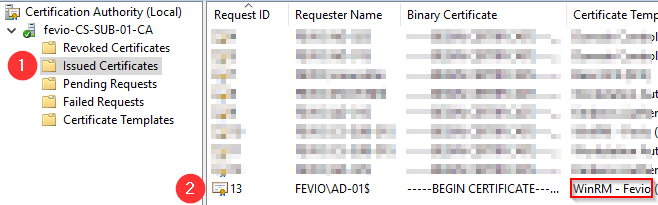
Check on the subordinate CA if the certificate has been issued properly, using the MMC view:
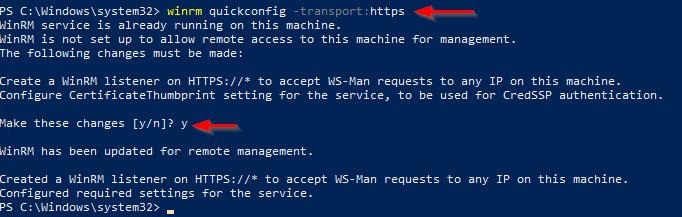
Go back on the server you to remotely access using WAC, and run with an elevated PowerShell the following command to create an HTTPS listener using the new certificate:
winrm quickconfig -transport:https
Note that you can run the command above through a remote Powershell session!
You should end with a positive message, and from there, good to connect using Windows Admin Center
Without an internal PKI
Without a PKI, you will have to generate a self-signed certificate then import it on your WAC gateway, that’s a bit dirty but if you just want to try, go ahead with the following:
Create a self-signed certificate (update the FQDN part, like myad-001.fevio.fr):
First, install the repository, GPG key, and install the Google Cloud SDK
# Add the Cloud SDK distribution URI as a package source
echo "deb http://packages.cloud.google.com/apt cloud-sdk main" | sudo tee -a /etc/apt/sources.list.d/google-cloud-sdk.list

# Import the Google Cloud Platform public key
curl https://packages.cloud.google.com/apt/doc/apt-key.gpg | sudo apt-key add -

# Update the package list and install the Cloud SDK
sudo apt-get update && sudo apt-get install google-cloud-sdk
Init the GCP SDK
On desktop workstations, you can use the regular gcloud init. However, on console-only systems, you will need to use the following command:
gcloud init --console-only
You will be asked to authenticate, then you will have to copy/paste an URL in your browser (Even if your are working remotely on another server):
Then, pick the project you want to work with, and set if ask, the default region (europe-west6-a for Zurich for instance).
Configure Terraform
Go to a clean folder on your Linux server, then edit a main.tf file with the following:
Note that we set the tier to STANDARD, you can use PREMIUM depending on your needs.
Then, create the account.json and paste the content of the key file you have created.
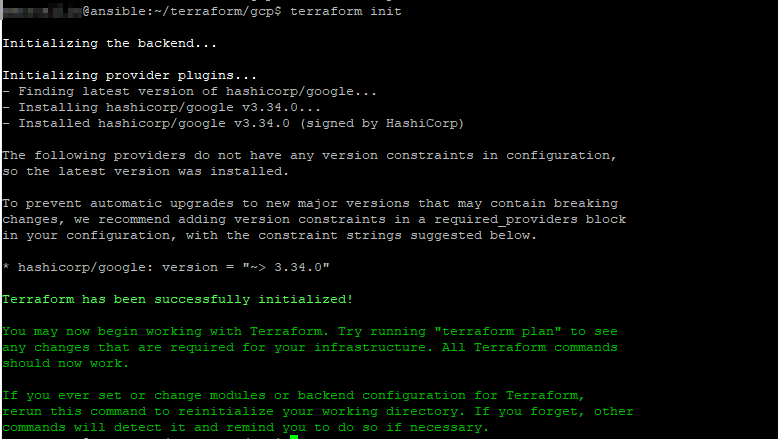
Eventually, run the following command to initialize your project:
terraform init
And you should end with a similar screen:
Example: create a vm instance in your project
Within your Terraform project folder, create beside the main.tf, a new file called whatever you want, but related to the instance you want to create, with the following content:
resource "google_compute_instance" "vm_instance" {
  name         = "my-instance-01"
  machine_type = "f1-micro"
  zone         = "europe-west6-a"

  boot_disk {
    initialize_params {
      image = "ubuntu-2004-focal-v20200720"
    }
  }

  network_interface {
    # A default network is created for all GCP projects
    network = "default"
    access_config {
    }
  }
}
This file defines a f1-micro instance located in europe-west6-a, running on ubuntu 20.04, with a default network configuration.
To check what is going to be created, run the command below:
terraform plan
To actually apply this plan, run the following command:


 Before moving further, at this time, there is no way to configure your Azure network to push another gateway that the Azure default to your machine, you can create route for the next-hop, but those routes can’t override the default gateway. Long story short, you will have to manually configure the default gateway of your servers to make them use your Fortigate as their next-hop.