Category Archives: Network

Devices management, best practices, etc.

Guacamole server using Docker

version: "2"
services:
  postgresql:
    image: 'postgres:latest'
	container_name: guacamole_db
	ports:
      - 5432:5432
	environment:
      POSTGRES_USER: guacamole_postgres # The PostgreSQL user (useful to connect to the database)
      POSTGRES_PASSWORD: YourOwnPassword # The PostgreSQL password (useful to connect to the database)
      POSTGRES_DB: guacamole # The PostgreSQL default database (automatically created at first launch)
  guacd:
    image: "guacamole/guacd"
    container_name: guacd
    hostname: guacd
    restart: always
    volumes:
      - "/data/shared/guacamole/guacd/data:/data"
      - "/data/shared/guacamole/guacd/conf:/conf:ro"
    expose:
      - "4822"
    ports:
      - "4822:4822"
    network_mode: bridge

  guacamole:
    image: "guacamole/guacamole"
    container_name: guacamole
    hostname: guacamole
    restart: always
    volumes:
      - "/data/shared/guacamole/guacamole/guac-home:/data"
      - "/data/shared/guacamole/guacamole/conf:/conf:ro"
    expose:
      - "8080"
    ports:
      - "8088:8080"
    network_mode: bridge
    environment:
      - "GUACD_HOSTNAME=localhost"
      - "GUACD_PORT=4822"
      - "POSTGRES_PORT=5432"
      - "POSTGRES_DATABASE=guacamole"
      - "GUACAMOLE_HOME=/data"
      - "POSTGRES_USER=guacamole_postgres"
      - "POSTGRES_PASSWORD=YourOwnPassword"
      - "POSTGRES_HOSTNAME=localhost"

Go ahead and spin it

docker-compose up -d

Now we need to init the database

docker run --rm guacamole/guacamole /opt/guacamole/bin/initdb.sh --postgresql > initdb.sql
docker container cp initdb.sql guacamole_db:/
docker container exec -it guacamole_db psql --dbname=guacamole --username guacamole_postgres -f /initdb.sql

Below the old way version (not working properly regarding the guacacd part)

Here a really quick draft to setup a Guacamole RDP server using a docker container and PostgreSQL

# Get the latest image
docker pull guacamole/guacamole

# Create volumes to persist data
docker volume create guacamole-vol-app
docker volume create guacamole-vol-db

# Create the dedicated network
docker network create --driver bridge guacamole-net

Configure the database:

# Spin up the container
docker run --detach --restart unless-stopped -v guacamole-vol-db:/var/lib/postgresql/data --network guacamole-net --name gcm-db-01 -e POSTGRES_PASSWORD=aRandomPasswd postgres

# Connect to the container
docker exec -it gcm-db-01 bash

# Then to PostgreSQL
psql -U postgres

# Create the DB
CREATE DATABASE guacamole WITH ENCODING 'UTF8' LC_COLLATE='en_US.UTF-8' LC_CTYPE='en_US.UTF-8' TEMPLATE=template0;

create user guacamole_postgres with password 'randomPassword';
GRANT ALL PRIVILEGES ON DATABASE guacamole to guacamole_postgres;

# Quit
\q

# Quit the container
Ctrl+p then q

# The following command will generate a file to be used for DB initialization
docker run --rm guacamole/guacamole /opt/guacamole/bin/initdb.sh --postgres > initdb.sql


# Copy the file to the container
docker container cp initdb.sql gcm-db-01:/

# Execute the file
docker container exec -it gcm-db-01 psql --dbname=guacamole --username postgres -f /initdb.sql

Configure your container:

# Pull GuacaCD
docker pull guacamole/guacd

# Generate the GuacaCD proxy
docker run --name gcm-cd-01 --network guacamole-net -d guacamole/guacd 

docker run --name gcm-app-01 --network guacamole-net \
     -e POSTGRES_HOSTNAME=gcm-db-01 \
     -e POSTGRES_DATABASE=guacamole  \
     -e POSTGRES_USER=guacamole_user    \
     -e GUACD_HOSTNAME=gcm-cd-01 \
     -e TOTP_ENABLED=true \
     -e POSTGRES_PASSWORD=aRandomPasswd \
     -d -p 8003:8080 guacamole/guacamole

TOTP_ENABLED=true enable a WhateverAuthenticator app to add another level of security.

Adguard Home with Docker

Following some issues with Pihole, I decided to check around for other solutions. I appears to me Adguard Home was here since a while, providing more features and some enhancements at the same time. So here I am, creating a small tutoriel to deploy it on a Docker container, please have a seat.

# Get the last version
docker pull adguard/adguardhome

# Create volumes to persist data
docker volume create adguard-vol-data
docker volume create adguard-vol-conf

# Create the dedicated network
docker network create --driver bridge adguard-net

Then create the actual container, for my setup, I decided to bind port 8001 to 3000 for the admin access. For a weird reason, during the wizard, if you choose to configure the admin pannel to port 3000 as described below, it will fails. So I had to start with the following Container’s definition, setup Adguard with port 80 as admin panel port access, then remove the container (data are persistant so no worries) then create it again with the next configuration.

docker run --name adg-01 \
     -v adguard-vol-data:/opt/adguardhome/work \
     -v adguard-vol-conf:/opt/adguardhome/conf \
     -p 53:53/tcp -p 53:53/udp \
     -p 8001:3000/tcp \
     --network adguard-net \
     -d adguard/adguardhome

As mentioned above, after the setup is done using the wizard (And telling it to listen on port 80 for your admin access), remove the container and rerun it with the following:

docker run --name adg-01 \
     -v adguard-vol-data:/opt/adguardhome/work \
     -v adguard-vol-conf:/opt/adguardhome/conf \
     -p 53:53/tcp -p 53:53/udp \
     -p 8001:80/tcp \
     --network adguard-net \
     -d adguard/adguardhome

Pihole server with Docker

This short article will help you running Pihole in a simple container.

Notice: You can go with Pihole depending on your needs, but I would now recommend switching to Adguard which is more evolved. If you are interested, take a look at my similar tutorial: https://blog.fevio.fr/2021/06/adguard-home-with-docker/

# First, create two dedicated volume (This is mandatory because how dmasq works)
docker volume create pihole-vol-app
docker volume create pihole-vol-dmasq

# A dedicated network for isolation
docker network create --driver bridge pihole-net

The next step will download and setup the actual Pihole container:

docker run -d \
     --name phl-01 \
     --network pihole-net \
     -p 53:53/tcp -p 53:53/udp \
     -p 8001:80 \
     -e TZ="Europe/Paris" \
     -v pihole-vol-app:/etc/pihole \
     -v pihole-vol-dmasq:/etc/dnsmasq.d \
     --dns=127.0.0.1 --dns=1.1.1.1 \
     --restart=unless-stopped \
     --hostname phl-01 \
     -e VIRTUAL_HOST="phl-01" \
     -e PROXY_LOCATION="phl-01" \
     -e ServerIP="127.0.0.1" \
     pihole/pihole:latest

Once it’s done, we need to get the random password generated during the setup

docker logs phl-01 2> /dev/null | grep 'password:'

# Should return something like:
Assigning random password: uHU7dwWE

Password update

As usual, it’s best to change the password you got, to do so, run the following command

docker exec -it phl-01 pihole -a -p

Now you can access your Pihole container using the host IP address and the port :8001 and should see Pihole interface as expected, for example: http://192.168.1.200:8001/admin/index.php

Aruba – usefull commands

I put here some commands I used to need while dealing with Aruba network devices, registered within Aruba Central.

Aruba Central state

# Check Aruba state
show aruba-central

# Disabling/enabling Aruba Central might be handy to know
aruba-central disable
aruba-central enable

aruba-central support mode disable

Provisioning

# Check provision state
show activate provision

# Force activation
activate provision force

If you got an SSL or whatever issue, you might want to check the firmware version.

Update the firmware on a switch

activate software-update check
activate software-update update

# If you had a provision error before, then run this after the reboot:
activate provision

Stack commands

# Show Stack details
show vsf

# Show details
show vsf details

# Show link between
show vsf link

# If you need to remove a member, you can use that. Be carrefull though, it will be removed from the Aruba Central group as well
vsf member 2 remove

Devices information about where they are connected

show port-access clients

To see access points, you can use the LLDP protocol or the device profile command:

show lldp info remote-device
show device-profile status

Disable an interface from the switch console

configure t
erminal
# To avoid having the switch not in sync
aruba-central support-mode enable
interface ethernet x/x 
disable
enable
aruba-central support-mode disable

OpenVPN server for mobile devices, TLS 1.3, and Ubuntu 20.04

This post is about configuring an OpenVPN server using an external Windows Certificate Server. We will use 443/TCP to connect our clients, in order to be more firewall friendly when connecting from unknown sites.

Package installation

Install the package, we won’t need the RSA package as we are going to use our own PKI.

apt get install openvpn

Configure routing for IPv4

Edit /etc/sysctl.conf and add the following lines at the botton:

net.ipv4.ip_forward = 1
net.ipv4.conf.all.accept_redirects = 0
net.ipv4.conf.all.send_redirects = 0

Then run this command to apply those change:

sysctl -p /etc/sysctl.conf

Later, to see if packets are hitting this rule, use the following command:

watch iptables -t nat -v -L POSTROUTING -n --line-number

Certificates part

Don’t use the /etc/openvpn/server folder as the startup script won’t use it, instead, let your server files in the /etc/openvpn folder

In order to configure your Openvpn server, generate a specific certificate for it. Get the key and the cert to your /etc/openvpn folder along with the intermediate root certificate.

  • ca.crt = intermediate root certificate including the root certificate
  • server.crt = openvpn public certificate
  • server.key = openvpn certificate key

Generate the ta.key and dh2048.pem

Those file will be used to secure the connection.

openvpn --genkey --secret ta.key
openssl dhparam -out dh2048.pem 2048

Install your root CA certificate

We need our server to trust our CA, in order to do that, do the following:

mkdir /usr/share/ca-certificates/extra
cp root.crt /usr/share/ca-certificates/extra/root.crt
dpkg-reconfigure ca-certificates

On the interactive screens, don’t forget to select the new certificate to import.

To ensure you setup this part properly, pick the openvpn certificate, including the root certificate (you need the whole chain here) and run this command on it:

openssl verify server.crt
server.crt: OK

Revoked certificate management

In order to be able to deny authentication to revoked certificate, you need to configure your OpenVPN server to read and verify certificate against the CRL list of your PKI.

Sadly, it seems openvpn only offers a local CRL file check, so you won’t be able to set the crl-verify with the CRL URL emplacement.

Instead, you need to download that CRL file ‘manually’ and also convert it from CRL to PEM in order to OpenVPN to read it.

Here how to do that:

From your OpenVPN folder:

# Here I had to fake the resolution, but you can remove that part which was specific to my needs
curl --resolve pki.mydomain.fr:80:192.168.1.221 http://pki.mydomain.fr/cdp/domain-CS-SUB-01-CA.crl --output domain-CS-SUB-01-CA.crl

# Then use OpenSSL to convert:
openssl crl -in domain-CS-SUB-01-CA.crl -inform DER -out domain-CS-SUB-01-CA.pem

Now you got the proper CRL file, go ahead and check within the server.conf file on the next step, how to set the crl-verify option:

Configure OpenVPN

/etc/openvpn/server/server.conf

port 443
proto tcp
dev tun
ca ca.crt
cert server.crt
key server.key
dh dh2048.pem
topology subnet

# The CRL file to check certificate validity
crl-verify mydomain-CS-SUB-01-CA.pem

server 10.8.0.0 255.255.255.0
ifconfig-pool-persist /var/log/openvpn/ipp.txt

# Your custom routes
push "route 192.168.1.0 255.255.255.0"
push "route 172.16.1.0 255.255.255.255"

push "redirect-gateway def1 bypass-dhcp"

# Custom DNS servers
push "dhcp-option DNS 9.9.9.9"

keepalive 10 120
cipher AES-256-GCM

# For extra security, 0 for the server, 1 for the clients
tls-auth ta.key 0 # This file is secret

# TLS settings enforcment
tls-version-min 1.3 'or-highest'

user nobody
group nogroup
persist-key
persist-tun
status /var/log/openvpn/openvpn-status.log
log         /var/log/openvpn/openvpn.log
log-append  /var/log/openvpn/openvpn.log
verb 3

# Because of TCP we need to disable this setting:
explicit-exit-notify 0

User client profile

client
dev tun
proto tcp
remote vpn.mydomain.fr 443
resolv-retry infinite
nobind
persist-key
persist-tun
cipher AES-256-GCM
verb 3
key-direction 1

<ca>
-----BEGIN CERTIFICATE-----
*** Subordinate CA ***
-----END CERTIFICATE-----
-----BEGIN CERTIFICATE-----
*** Root CA ***
-----END CERTIFICATE-----
</ca>

<cert>
-----BEGIN CERTIFICATE-----
*** User certificate ***
-----END CERTIFICATE-----
</cert>

<key>
-----BEGIN RSA PRIVATE KEY-----
*** User key ***
-----END RSA PRIVATE KEY-----
</key>

<tls-auth>
#
# 2048 bit OpenVPN static key
#
-----BEGIN OpenVPN Static key V1-----
*** Content of the secret ta.key available on the server ***
-----END OpenVPN Static key V1-----
</tls-auth>

Auto start OpenVPN server on Ubuntu

And start OpenVPN:

systemctl restart openvpn@server

Check OpenVPN status:

systemctl status openvpn@server

Setup OPNsense 20.7 for IPsec mobile VPN (AkA Road-Warrior)

Since I migrated my former PfSense appliance to OPNsense, I had to reconfigure many services. Today, I’ll explain how I configured it to connect your Android devices using the native IPsec client (Obviously, this should work with other mobile and device brands)

Note that the cipher suites and other security protocols used in this post are set according to what is available on my remote devices. Thus, you would be able to higher those protocols depending on your hardware support.

Configuring OPNsense

Mobile Clients

Access your OPNsense appliance, then go to VPN > IPsec > Mobile Clients and configure it using the following options. Note that I have listed only what that matters, feel free to play with those options.

  • Virtual IPv4 Address Pool: A brand new network to be used by your remote devices
  • DNS Servers: Set your local DNS servers here
  • Phase 2 PFS Group: let this off

Save and apply changes before moving on. You should see a “No Phase 1 found” or a similar message, if so, click on it to access the next step.

Tunnel Settings

Go to VPN > IPsec > Tunnel Settings to create your tunnel interface.

General information

Again, use the following elements to configure your phase 1:

  • Connection method: Start on traffic
  • Key Exchange version: v1 (v2 was not supported for Mobile client)
  •  Interface: WAN

Phase 1 proposal (Algorithms)

  • Encryption algorithm: AES 256
  • Hash algorithm: SHA256
  • DH key group: 2 (1024bits)
  • Install policy: checked (Let the other checkbox unchecked)

Save then apply your settings.

Phase 2 configuration

Go back to VPN > IPsec > Tunnel Settings

On the right side of the tunnel you just have created, you should see a + button, click on it:

  • Mode: Tunnel IPv4
  • Type:
    • Network: you will be able to set a global network (0.0.0.0/0) which will allow your devices to access all your different networks (like LAN and Internet)
    • LAN or any subnet you have: Your devices won’t be able to join any other subnet
  • Protocol: ESP (ESP is encryption, AH is authentication only)
  • Encryption algorithms: aes256gcm16
  • Hash algorithms: SHA512
  • PFS key group: off

Save the configuration, and apply it as always.

Finally, on the VPN > IPsec > Tunnel Settings page, click on the Enable IPsec button then save to actually start IPsec:

On the same page, you should see the green arrow telling you the service is running properly:

Top right of the Tunnel settings page

Firewall configuration

We need to configure the firewall by adding rules and NAT policy.

Rules

WAN interface

We need to allow our remote clients to access our IPsec server, to do so, create the following rules:

IPsec ESP
  • Protocol: IPv4 ESP
  • Other settings: *
IPsec ISAKMP
  • Protocol: IPv4 UDP
  • Port: 500 (ISAKMP)
  • Other settings: *
IPsec NAT-T
  • Protocol: IPv4 TCP/UDP
  • Port: 4500 (IPsec NAT-T)
  • Other settings: *

IPsec interface

IPsec to LAN net

Here you have to decide which protocols you want to allow from your remote clients to your LAN devices, don’t forget to allow at least DNS if your custom DNS servers are hosted on that subnet.

IPsec to WAN net

Same as above, you’re in charge to choose which services you want to authorize.

NAT

We need to update the default configuration in order to enable NAT between our IPsec interface and the WAN interface. To do so, open the Firewall > NAT > Outbound

  1. If not already done, select “Hybrid outbound NAT rule generation” then apply changes to be able to add manual rules.
  2. Add a new rule with the following information:
    • Interface: WAN
    • Source address: your remote devices VPN network (the one you created at the beginning)

Android configuration

Here an example using a Galaxy S7 and its native VPN client.

  • Go to Settings > Connections > More connection settings > VPN
  • Click Add VPN
  • Configure your VPN with the following:
    • Name: it’s up to you
    • Type: IPSec Xauth PSK
    • Server Address: if using a DNS name, you won’t be able to use the Always-on feature, so use your static public IP if you are lucky enough
    • IPsec pre-shared key: use the key you have choose before
    • Username: this depends on the Authentication backend you selected

How to troubleshoot ?

If you go to VPN> IPsec > Log File you will be able to see if your remote devices are hitting your server, and see issues with proposals mismatch, authentication issues and more.

I would also recommend not to be too strict at the beginning, regarding the cipher suites and other security protocols. Set them wide then tweak your configuration one security setting at a time.

If you can reach your LAN devices but Internet when connected, check the NAT and firewall rules.

OPNSense Insight

OPNSense: Fix Insight feature issue when getting “No data available”

Not so long ago, I switched my firewall/routing/all-in-home network solution from PfSense to OPNSense. While it was working quiet well for months, I have noticed that the Insight feature was showing me a “No data available”. I’ll explain how I worked around it, maybe some other solutions exist though.

Why this happened?

After some investigation, I found that issue was caused by the latest upgrades I applied. I must admit this is a bit disappointing since I don’t update OPNSense configuration very often, actually, it was working for 3 months without any modification… Anyway, let’s say this is not important enough to be a real bumper, but I’m still thinking that maybe other features were broken and I just didn’t discover them yet…

What is broken exactly?

It seems the issue is related to a Sqlite database corruption, first I checked the flowd service using that command under an elevated shell:

service flowd_aggregate status

And the service was not running, so I checked the log under System>Log files>General to see that I had a lot of lines involving an issue with flowd_aggregate service.

Eventually, going under Reporting>Settings then hit Reset Netflow Data did the job. Don’t forget to restart the flowd_aggregate service too. Doing that, you will lose former data, and just so you know, I tried the Repair Netflow Data with no joy.

How to find a Linux server public IP address, from its terminal

Today, I would like to summarize some of the commands I usually use when I want to check the public IP address used by a server when connected through SSH. It’s a very simple post, yet I think that can help people at some point:

Using curl, the easiest way in my opinion:

curl ifconfig.me

Using dig and OpenDNS, way too complicated if you ask me:

dig +short myip.opendns.com @resolver1.opendns.com

Using wget, if curl is not available (that should never happen though), the file will be downloaded (index.html). You might use a command with pipe in order to get the IP address from the downloaded content:

wget http://monip.org

Configure a virtual Fortigate in Microsoft Azure

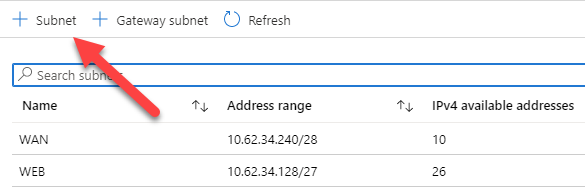
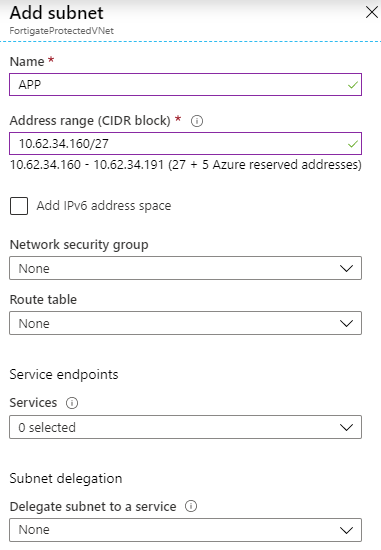
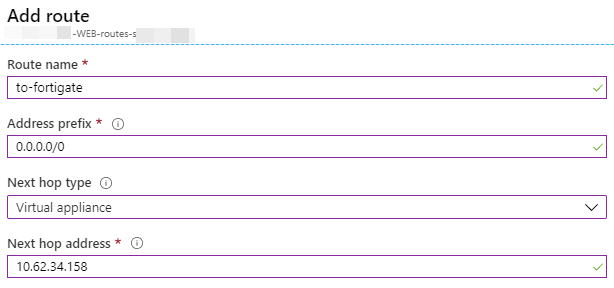
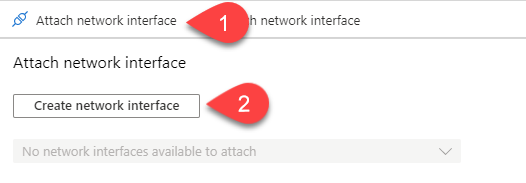
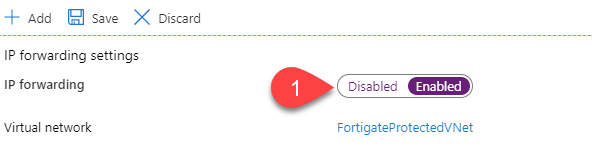
⚠ Before moving further, at this time, there is no way to configure your Azure network to push another gateway that the Azure default to your machine, you can create route for the next-hop, but those routes can’t override the default gateway. Long story short, you will have to manually configure the default gateway of your servers to make them use your Fortigate as their next-hop.

First, you will need to know the different subnets that you will use, in this example, I will use four subnets:

  • 10.62.34.240/28, this one will be used for the WAN connection
  • 10.62.34.160/27, this one will be used to connect machines to port1
  • 10.62.34.128/27, this one for port2
  • 10.62.34.192/28, and the last one for port3

Note that, depending on your interfaces need, you will have to choose a different appliance from the Microsoft pay-as-you-go catalogue. In order to create that appliance with 4 interfaces, I had to pick the Standard F4 (4 vcpus, 8 GiB memory) size. The virtual network and two subnets will be created during the creation process, call the first WAN and the second WEB or whatever makes sense for your port2.

So, you have created your subnets, then your appliance (FGT), and it’s now time to configure your network, before powering on the FGT. Unfortunately, it should have been turned on right after its creation, so shut it down for now.

Configuring the existing subnets

Edit the virtual network created by the wizard, at the time I’m writing this, it’s called FortigateProtectedVNet. You should see your two subnets:

We have to remove the Network Security Group (NSG) assigned by default, except for the WAN subnet, because we want to manage the security through the Fortigate itself. We could have choose to use them as an additional security layer, but in order to keep things simple here, we won’t discuss that part.

For each existing subnet, click on Network Security Group:

Click on the edit button, then on the NSG assigned:

Choose none in the left list:

On the next screen, clic save to confirm the change, repeat the operation for the second subnet.

Adding the other two subnets

We need to create the other two subnets. Go back to the FortigateProtectedVNet object, and within the left menu, click Subnets:

Click the + Subnet button to add a new one:

Add your new subnets, don’t add a NSG or a route table yet:

Adding and configuring routing tables

In order to tell your future VMs which routes using to access ressources, Azure is using routing table. These routing tables are linked to one or many subnets.

During the creation of your Fortigate, two subnets were created along two routing tables. We have to configure them (especially the second one) and add two new routing tables for the new subnets we have created above.

Go to your ressource group, then add a new route table object:

For the naming, I usually use the same name of the automated generated routes, updating only the subnet part, for instance:

Leave the virtual network route propagation enabled.

Once your new routes have been created, we need to configure them. The WAN routes doesn’t need to be updated. However, for all the other routes, do the following:

Click on the route table you want to configure, then Routes:

Remove all the current routes defined. Then create this following route to tell your VM to use the Fortigate interface as the next hop:

The next hop must match with the future IP of the Fortigate interface connected to that specific subnet. T

Once the route is added, it’s time to associate the subnet, click on Subnets on the left side:

Click the Associate button, and select the proper network/subnet:

Do the same thing for the other subnets (Except for WAN!)

Add new interfaces to the Fortigate

The current FGT has only two interfaces, turn it off then open its object in order to add two new interfaces.

Got to Networking:

Click Attach network interface:

Use the same pattern for the name, replacing the Nic part with the next number (Should be 2 and 3 for APP and DB). Check Static to set your Fortigate interface IP:

The interface will be created. But you still need to attach it manually on the next screen:

Repeat these operations for the last Nic3 interface.

IP forwarding and

We now need to configure those two new interfaces, for that, click on the interface tab, then on the interface name (#2 on the capture below) to access the configuration pane:

From here, click on IP configurations:


And enable the IP forwarding feature:

Save, and do the same thing with the last interface (Nic3).

In order to improve performances, we would like to enable accelerated networking, to do so, we need the FGT to be off (That should be the case at this stage) and then we need to run some commands.

Click on the Cloud Shell icon on the top right toolbar:

Choose Powershell when asked in the console area, down the window, create a storage (That’s mandatory). If you got a permission issue, click the Advanced Options and from there, create it:

Once connected to the Powershell console, run the following command to enable accelerated networking:

az network nic update --name Nic2 --resource-group YourRessourceGroupName --accelerated-networking true

Exit the console, refresh the whole portal, and you should now see the following:

Accessing your Fortigate

You can now start your FGT, and the use the public IP address created by the wizard to access the portal, using HTTPS.

If you have any issue accessing the interface of your Fortigate, ensure that the NSG created by default still associated to the Nic0 interface, you should have this:

How to check if your emails are trusted outside your company?

Sending emails is always something tricky to deal with, every ISP, antivirus, security are working on their own solution to fight scams, spam, fishing, etc. That makes difficult to have a proper SMTP server configured and trusted by all those third parties.

This post is not about what you should configure in order to your server to be trusted, but a website you can use to see what you have missed or well configured about it.

That’s being said, please check the following before give it a try:

  • Ensure the public IP address used by your server to send emails is defined in the SPF record of the DNS server in charge of your domain;
  • Ensure that a reverse DNS is also configured, binding this public IP address to the same name used by your SMTPS server (Hostname)
  • Ensure you have configured DKIM
  • Ensure your public IP address is not blacklisted

Then, you can go to this website, https://www.mail-tester.com/ . From here, you will get a temporary email address to send an email to, then by clicking on th button, it will display a very detailed amount of information about your SMTP server configuration

That’s very handy to check the basic of sending emails on Internet!