Sometimes, I have to test a webservice from a device who can’t resolve the name of it.
When that’s required, you can count on CURL to achieve that easily:
curl --resolve www.example.com:80:127.0.0.1 http://www.example.com/Useful tips, notes or IT resources by Sébastien Marcellin
Sometimes, I have to test a webservice from a device who can’t resolve the name of it.
When that’s required, you can count on CURL to achieve that easily:
curl --resolve www.example.com:80:127.0.0.1 http://www.example.com/Windows Admin Center (WAC) is a new way introduced by Microsoft to manage your servers, workstations, and clusters.
WAC gateway is the tool you install on a server or workstation to act as a gateway between administrators and servers/stations/clusters. During its installation, you will be asked to choose between regular or encrypted communication between your assets and this gateway. As we should all do, I did choose encrypted communication.
Choosing TLS implies you to deploy a valid certificate for your server to encrypt its gateway’s connection. This certificate must be trusted by your gateway machine obviously. Here the process to do it, using a self-signed one though.
First, if its a workstation and not a server, you need to enable PSRemoting
Enable-PSRemotingThen allow port 5986 between your server and the gateway (This must be done on the server, because installing WAC on your gateway should have fixed that already.
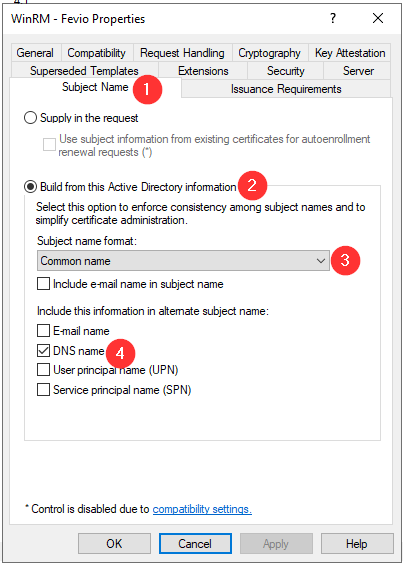
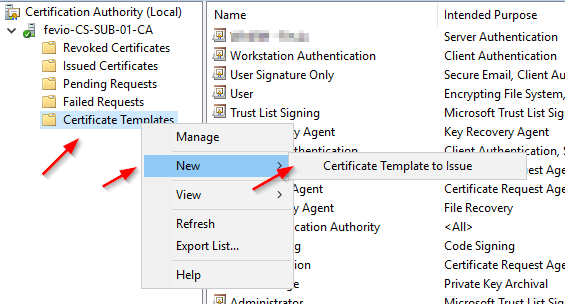
New-NetFirewallRule -DisplayName "WinRM HTTPS" -Direction Inbound -LocalPort 5986 -Protocol TCP -Action AllowIf your organization has a PKI infrastructure, you will need to configure it to delivers certificates to your servers and workstations.
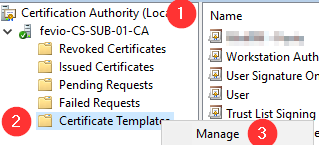
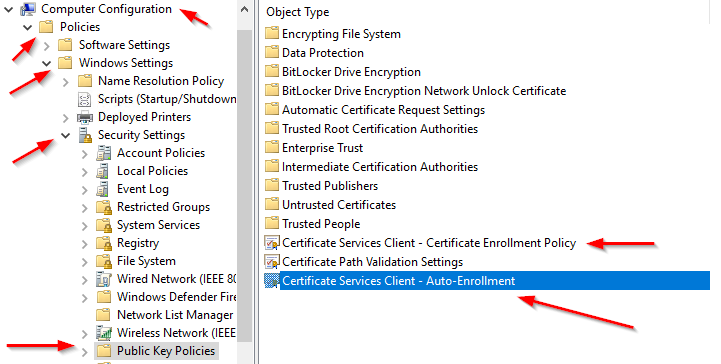
Refresh the GPO on one of the server you want to remotely manage:
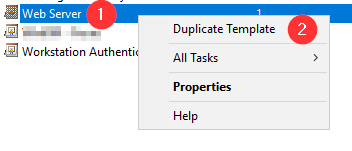
gpupdate /forceCheck on the subordinate CA if the certificate has been issued properly, using the MMC view:
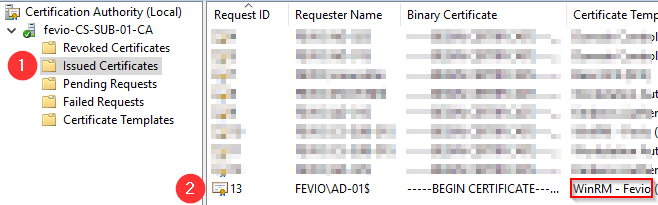
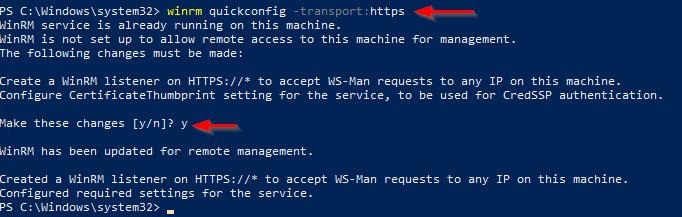
Go back on the server you to remotely access using WAC, and run with an elevated PowerShell the following command to create an HTTPS listener using the new certificate:
winrm quickconfig -transport:httpsNote that you can run the command above through a remote Powershell session!
Without a PKI, you will have to generate a self-signed certificate then import it on your WAC gateway, that’s a bit dirty but if you just want to try, go ahead with the following:
Create a self-signed certificate (update the FQDN part, like myad-001.fevio.fr):
New-SelfSignedCertificate -CertStoreLocation Cert:\LocalMachine\My -DNSName "<FQDN>"Then create an HTTPS listener for WinRM (Update FQDN and Thumbprint accordingly)
CMD /C 'winrm create winrm/config/Listener?Address=*+Transport=HTTPS @{Hostname="<FQDN>";CertificateThumbprint="<Thumbprint>"}'Export this certificate to be imported into the gateway’s side (Update FQDN and Thumbprint accordingly):
$Cert = Get-ChildItem -Path Cert:\LocalMachine\My\<Thumbprint>
Export-Certificate -Cert $Cert -FilePath "C:\<FQDN>.crt" -Type CERT
Then add the certificate to the gateway:
Go through “Manage computer certificate” then “Trusted Root Certification Authorities” then import your cert in that folder.
Run WAC and should be able to connect now!
New-NetFirewallRule -DisplayName "Allow WinRM HTTPS" -Direction Inbound -LocalPort 5986 -Protocol TCP -Action AllowOften, especially when dealing with both Windows and Linux servers, I have to convert from a format to another. Here are some commands to do so
Using Openssl on Windows 10 (Might be compatible with Linux machines as well, but you know, sometimes you need to adjust commands)
openssl x509 -in .\cs-root-01_CS-ROOT-01-CA.crt -inform der -outform pem -out myCert.pemFirst, install the related package
apt install strongswan -yGenerate a PSK to be used on both ends (Save it to a secure place to avoid loosing it):
openssl rand -base64 64You will get something like this:
YGOnBqAi0FOZNC36gg5jy9B9ROZavhMPDMDLXfknZdbQrWm+sRV200hkFsp6Ja4Y
7uDWFbljD2Hr36c3SQC27w==
Edit /etc/sysctl.conf and add the following lines at the botton:
net.ipv4.ip_forward = 1
net.ipv4.conf.all.accept_redirects = 0
net.ipv4.conf.all.send_redirects = 0
Then run this command to apply those change:
sysctl -p /etc/sysctl.confThe file /etc/ipsec.secrets contains the PSK for your tunnels, edit it accordingly:
# This file holds shared secrets or RSA private keys for authentication.

# RSA private key for this host, authenticating it to any other host
# which knows the public part.
vpn.mydomain.fr : PSK "YGOnBqAi0FOZNC36gg5jy9B9ROZavhMPDMDLXfknZdbQrWm+sRV200hkFsp6Ja4Y7uDWFbljD2Hr36c3SQC27w=="The file /etc/ipsec.conf contains the tunnels configuration details:
# ipsec.conf - strongSwan IPsec configuration file

# basic configuration
config setup
        charondebug="all"
        uniqueids=yes
        strictcrlpolicy=no

# Add connections here.
# Base information used as template
conn sts-base
    authby=secret
    fragmentation=yes
    dpdaction=restart
    ike=aes128-sha256-curve25519
    esp=aes256gcm16-curve25519!
    keyingtries=1
    leftid=1.1.1.1

# OPNsense connection
conn vpn-01
    also=sts-base
    keyexchange=ikev2
    leftsubnet=10.0.0.0/32
    rightsubnet=192.168.0.0/24
    # for this to work, DNS must be usable and working.
    right=%vpn.mydomain.fr
    auto=start
Here, we have defined a template connection that holds the common tunnel settings like IKE settings. In addition, we defined the actual OPNsense connection. Note that we can define multiple left or right networks using comma separated networks.
Now it’s about configuring our local OPNsense, which is really easy too. Just follow the next steps:
Go to VPN > IPsec > Tunnel Settings
Now you all set, I am sure you want to try it, here some commands in order to troubleshoot your tunnel on the Strongswan side:
Show Strongswan status:
ipsec status

# If all good, you should see something like that:
Security Associations (1 up, 0 connecting):
      vpn-01[2]: ESTABLISHED 4 minutes ago, 10.0.0.1[1.1.1.1]...2.2.2.2[vpn.mydomain.fr]
      vpn-01{2}:  INSTALLED, TUNNEL, reqid 1, ESP in UDP SPIs: c1e50580_i ce6450e0_o
      vpn-01{2}:   10.0.0.0/24 === 192.168.1.0/24
Restart Strongswan:
ipsec restartTurn on a tunnel by its name (see your ipsec.conf configuration file):
ipsec up connectionNameReplace up by down to shutdown a tunnel.
You will find simple commands to set up your network adapter settings using PowerShell.
Get the nework cards list:
Get-NetAdapterOnce you know which card you want to setup, we can store store it in a variable:
$netadapter = Get-NetAdapter -Name EthernetThen, you can run different commands to setup specific settings:
$netadapter | Set-NetIPInterface -Dhcp Disabled$netadapter | New-NetIPAddress -IPAddress 10.0.0.251 -PrefixLength 24 –DefaultGateway 10.0.0.254$netadapter | Set-DnsClientServerAddress -ServerAddresses ("10.0.0.1","10.0.0.2")$netadapter | Set-DnsClient -ConnectionSpecificSuffix "fevio.fr"