This post is about configuring an OpenVPN server using an external Windows Certificate Server. We will use 443/TCP to connect our clients, in order to be more firewall friendly when connecting from unknown sites.
Package installation
Install the package, we won’t need the RSA package as we are going to use our own PKI.
apt get install openvpnConfigure routing for IPv4
Edit /etc/sysctl.conf and add the following lines at the botton:
net.ipv4.ip_forward = 1
net.ipv4.conf.all.accept_redirects = 0
net.ipv4.conf.all.send_redirects = 0
Then run this command to apply those change:
sysctl -p /etc/sysctl.confLater, to see if packets are hitting this rule, use the following command:
watch iptables -t nat -v -L POSTROUTING -n --line-numberCertificates part
Don’t use the /etc/openvpn/server folder as the startup script won’t use it, instead, let your server files in the /etc/openvpn folder
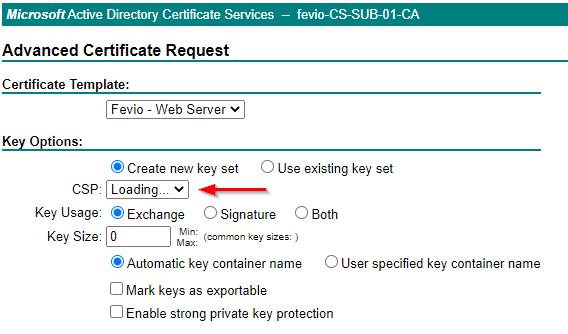
In order to configure your Openvpn server, generate a specific certificate for it. Get the key and the cert to your /etc/openvpn folder along with the intermediate root certificate.
- ca.crt = intermediate root certificate including the root certificate
- server.crt = openvpn public certificate
- server.key = openvpn certificate key
Generate the ta.key and dh2048.pem
Those file will be used to secure the connection.
openvpn --genkey --secret ta.key
openssl dhparam -out dh2048.pem 2048
Install your root CA certificate
We need our server to trust our CA, in order to do that, do the following:
mkdir /usr/share/ca-certificates/extra
cp root.crt /usr/share/ca-certificates/extra/root.crt
dpkg-reconfigure ca-certificates
On the interactive screens, don’t forget to select the new certificate to import.
To ensure you setup this part properly, pick the openvpn certificate, including the root certificate (you need the whole chain here) and run this command on it:
openssl verify server.crt
server.crt: OK
Revoked certificate management
In order to be able to deny authentication to revoked certificate, you need to configure your OpenVPN server to read and verify certificate against the CRL list of your PKI.
Sadly, it seems openvpn only offers a local CRL file check, so you won’t be able to set the crl-verify with the CRL URL emplacement.
Instead, you need to download that CRL file ‘manually’ and also convert it from CRL to PEM in order to OpenVPN to read it.
Here how to do that:
From your OpenVPN folder:
# Here I had to fake the resolution, but you can remove that part which was specific to my needs
curl --resolve pki.mydomain.fr:80:192.168.1.221 http://pki.mydomain.fr/cdp/domain-CS-SUB-01-CA.crl --output domain-CS-SUB-01-CA.crl

# Then use OpenSSL to convert:
openssl crl -in domain-CS-SUB-01-CA.crl -inform DER -out domain-CS-SUB-01-CA.pem
Now you got the proper CRL file, go ahead and check within the server.conf file on the next step, how to set the crl-verify option:
Configure OpenVPN
/etc/openvpn/server/server.conf
port 443
proto tcp
dev tun
ca ca.crt
cert server.crt
key server.key
dh dh2048.pem
topology subnet

# The CRL file to check certificate validity
crl-verify mydomain-CS-SUB-01-CA.pem

server 10.8.0.0 255.255.255.0
ifconfig-pool-persist /var/log/openvpn/ipp.txt

# Your custom routes
push "route 192.168.1.0 255.255.255.0"
push "route 172.16.1.0 255.255.255.255"

push "redirect-gateway def1 bypass-dhcp"

# Custom DNS servers
push "dhcp-option DNS 9.9.9.9"

keepalive 10 120
cipher AES-256-GCM

# For extra security, 0 for the server, 1 for the clients
tls-auth ta.key 0 # This file is secret

# TLS settings enforcment
tls-version-min 1.3 'or-highest'

user nobody
group nogroup
persist-key
persist-tun
status /var/log/openvpn/openvpn-status.log
log         /var/log/openvpn/openvpn.log
log-append  /var/log/openvpn/openvpn.log
verb 3

# Because of TCP we need to disable this setting:
explicit-exit-notify 0
User client profile
client
dev tun
proto tcp
remote vpn.mydomain.fr 443
resolv-retry infinite
nobind
persist-key
persist-tun
cipher AES-256-GCM
verb 3
key-direction 1

<ca>
-----BEGIN CERTIFICATE-----
*** Subordinate CA ***
-----END CERTIFICATE-----
-----BEGIN CERTIFICATE-----
*** Root CA ***
-----END CERTIFICATE-----
</ca>

<cert>
-----BEGIN CERTIFICATE-----
*** User certificate ***
-----END CERTIFICATE-----
</cert>

<key>
-----BEGIN RSA PRIVATE KEY-----
*** User key ***
-----END RSA PRIVATE KEY-----
</key>

<tls-auth>
#
# 2048 bit OpenVPN static key
#
-----BEGIN OpenVPN Static key V1-----
*** Content of the secret ta.key available on the server ***
-----END OpenVPN Static key V1-----
</tls-auth>
Auto start OpenVPN server on Ubuntu
And start OpenVPN:
systemctl restart openvpn@serverCheck OpenVPN status:
systemctl status openvpn@server