Recently my dear was looking for an application to manage her wine cellar. As a former web developer, I immediately wanted to create the best app for her needs. However, I was a PHP developer, and it was not the best language to develop such a tool. So, I decided to learn Angular, I did that for a month, ended up with a nice structure then I had to stop, because of my new position which was too intense to let me continue.
Now, I have been able to keep some time for me, so here I am starting over with Angular 12, yes, many updates were released since my first iteration and as a newbie, I think it would be better to start everything over…
Anyway, first thing first, I need to setup my workspace and this is the page to start with. Let’s go…
Infrastructure
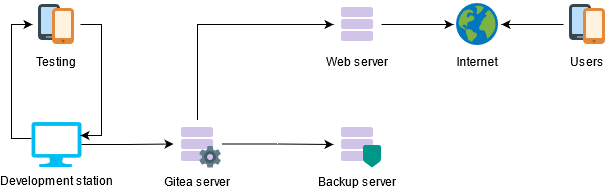
Gitea server – code management
In order to keep track of my code, I will try to use Gitea which was highly recommended on the web, using a Docker container.
Docker compose
Here the docker compose file I used to create a very basic server
version: "3"

networks:
  gitea:
    external: false

services:
  server:
    image: gitea/gitea:latest
    container_name: gitea
    environment:
      - USER_UID=1000
      - USER_GID=1000
    restart: always
    networks:
      - gitea
    volumes:
      - gitea:/data
      - /etc/timezone:/etc/timezone:ro
      - /etc/localtime:/etc/localtime:ro
    ports:
      - "8010:3000"
      - "222:22"
volumes:
  gitea:
Then launch docker-compose up -d to start the container in background mode

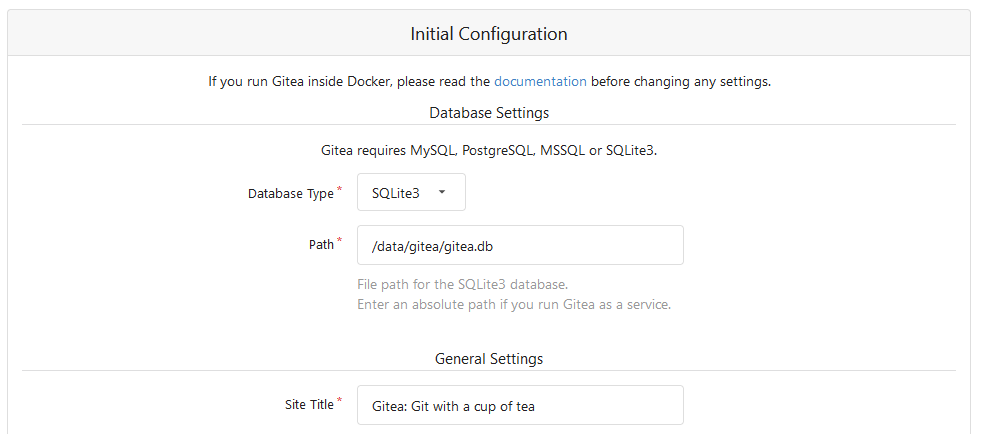
- Database: SQLite3 to avoid having a separated SQL server for my own small projects
- …
- Gitea Base URL: you can use the current IP mode, or use a reverse proxy with Let’s encrypt to make things more secure/professional, it’s up to you.
- Email settings: think about adding the port in the end, for instance: smtp.gmail.com:465
Once your done, you can access and authenticate to your brand new Gitea server.
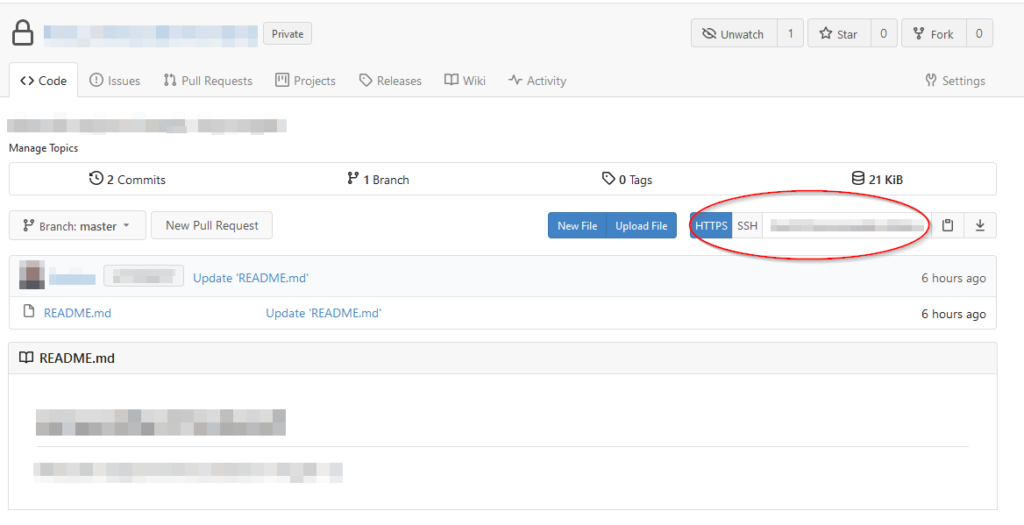
Configure the repository
Use Gitea web interface to create a new Organization then a new repository, there is nothing complex here. Once it’s properly setup you should end up with a single file project (the README.md) on your repo. On the project’s page, locate the HTTPS part and copy the URL on its right.
Install GIT client on Windows
In order to get Git command, install the following chocolatey package
chocolatey install gitNext, open a PowerShell client, browse to your project repository, then run the following commands, using the HTTPS URL you got just before
git init
git remote add my-project https://git.yourdomain.ca/MyOrganization/my-project.git
To pull your repository content, which is actually only your README.md file, run the following command
git pull my-project masterYou should now see the README.md file on your computer’s local folder.
If you want to push, this is the command
git push my-project masterThis is it for this introduction, next time I will discuss about installing NodeJS, NPM and eventually Angular!