Since I migrated my former PfSense appliance to OPNsense, I had to reconfigure many services. Today, I’ll explain how I configured it to connect your Android devices using the native IPsec client (Obviously, this should work with other mobile and device brands)
Note that the cipher suites and other security protocols used in this post are set according to what is available on my remote devices. Thus, you would be able to higher those protocols depending on your hardware support.
Configuring OPNsense
Mobile Clients
Access your OPNsense appliance, then go to VPN > IPsec > Mobile Clients and configure it using the following options. Note that I have listed only what that matters, feel free to play with those options.
- Virtual IPv4 Address Pool: A brand new network to be used by your remote devices
- DNS Servers: Set your local DNS servers here
- Phase 2 PFS Group: let this off
Save and apply changes before moving on. You should see a “No Phase 1 found” or a similar message, if so, click on it to access the next step.
Tunnel Settings
Go to VPN > IPsec > Tunnel Settings to create your tunnel interface.
General information
Again, use the following elements to configure your phase 1:
- Connection method: Start on traffic
- Key Exchange version: v1 (v2 was not supported for Mobile client)
- Interface: WAN
Phase 1 proposal (Algorithms)
- Encryption algorithm: AES 256
- Hash algorithm: SHA256
- DH key group: 2 (1024bits)
- Install policy: checked (Let the other checkbox unchecked)
Save then apply your settings.
Phase 2 configuration
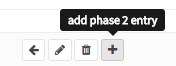
Go back to VPN > IPsec > Tunnel Settings
On the right side of the tunnel you just have created, you should see a + button, click on it:
- Mode: Tunnel IPv4
- Type:
- Network: you will be able to set a global network (0.0.0.0/0) which will allow your devices to access all your different networks (like LAN and Internet)
- LAN or any subnet you have: Your devices won’t be able to join any other subnet
- Protocol: ESP (ESP is encryption, AH is authentication only)
- Encryption algorithms: aes256gcm16
- Hash algorithms: SHA512
- PFS key group: off
Save the configuration, and apply it as always.
Finally, on the VPN > IPsec > Tunnel Settings page, click on the Enable IPsec button then save to actually start IPsec:
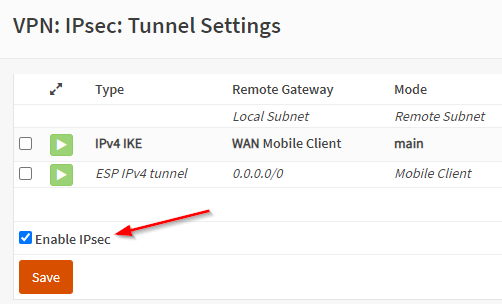
On the same page, you should see the green arrow telling you the service is running properly:

Firewall configuration
We need to configure the firewall by adding rules and NAT policy.
Rules
WAN interface
We need to allow our remote clients to access our IPsec server, to do so, create the following rules:
IPsec ESP
- Protocol: IPv4 ESP
- Other settings: *
IPsec ISAKMP
- Protocol: IPv4 UDP
- Port: 500 (ISAKMP)
- Other settings: *
IPsec NAT-T
- Protocol: IPv4 TCP/UDP
- Port: 4500 (IPsec NAT-T)
- Other settings: *
IPsec interface
IPsec to LAN net
Here you have to decide which protocols you want to allow from your remote clients to your LAN devices, don’t forget to allow at least DNS if your custom DNS servers are hosted on that subnet.
IPsec to WAN net
Same as above, you’re in charge to choose which services you want to authorize.
NAT
We need to update the default configuration in order to enable NAT between our IPsec interface and the WAN interface. To do so, open the Firewall > NAT > Outbound
- If not already done, select “Hybrid outbound NAT rule generation” then apply changes to be able to add manual rules.
- Add a new rule with the following information:
- Interface: WAN
- Source address: your remote devices VPN network (the one you created at the beginning)
Android configuration
Here an example using a Galaxy S7 and its native VPN client.
- Go to Settings > Connections > More connection settings > VPN
- Click Add VPN
- Configure your VPN with the following:
- Name: it’s up to you
- Type: IPSec Xauth PSK
- Server Address: if using a DNS name, you won’t be able to use the Always-on feature, so use your static public IP if you are lucky enough
- IPsec pre-shared key: use the key you have choose before
- Username: this depends on the Authentication backend you selected
How to troubleshoot ?
If you go to VPN> IPsec > Log File you will be able to see if your remote devices are hitting your server, and see issues with proposals mismatch, authentication issues and more.
I would also recommend not to be too strict at the beginning, regarding the cipher suites and other security protocols. Set them wide then tweak your configuration one security setting at a time.
If you can reach your LAN devices but Internet when connected, check the NAT and firewall rules.